Right now, our team is deep in the planning and early construction phases of one of the most ambitious custom home builds we’ve taken on to date: a 4,700-square-foot custom residence in Boonton, New Jersey, set on a beautifully wooded, multi-acre lot.
With a dramatically sloped lot and a detailed architectural design, this is definitely not a cookie-cutter build. It’s exactly the kind of project that demonstrates why thorough pre-construction planning isn’t just a best practice, it’s the foundation that makes everything else possible.
In this post, we’re pulling back the curtain on what’s happening right now. With the site work underway, the photorealistic renderings we’ve completed, and what a real-world budget breakdown looks like for a home of this scope.
Engineering the Land Before the First Wall Goes Up
Before framing begins, the land has to be ready, which means excavation and site work. On a steeply sloped lot like this one, that’s a substantial undertaking. The rear of the property features a dramatic grade change that required a carefully engineered system of tiered retaining walls, creating a terraced structure that will eventually support hardscaping, a pool, and the natural backyard environment the homeowner envisioned.
However, it’s important to realize that retaining walls like these aren’t simply stacked stone. A structural engineer designs each wall to spec, accounting for soil load, water pressure, and long-term stability. Behind the visible face of each wall is a complex drainage system that includes landscape fabric, compacted gravel, and perforated pipe that channels water away from the wall’s base. The home itself is also designed to route rooftop water collection into a seepage pit positioned beyond the wall system, ensuring that water from the house never adds pressure against the retaining structure.
In addition to the tiered walls, the site work for this project includes:
- Well and septic installation — the property is not served by municipal utilities, so both systems are being established from scratch
- Driveway access and grading — establishing proper grade and drainage across the full approach
- Excavation and fill — the sloped terrain required significant earth movement to create a stable building pad
This is the kind of work that can’t be rushed or estimated loosely. For projects like this, we engage engineering partners early so that every wall, pipe, and drainage channel is designed before the first excavator shows up. That investment in planning is what prevents costly surprises during construction.
Seeing the Home Before It’s Built
One of the most powerful tools we use during the pre-construction phase of a design-build project is photorealistic 3D rendering. This project is a perfect example of why.
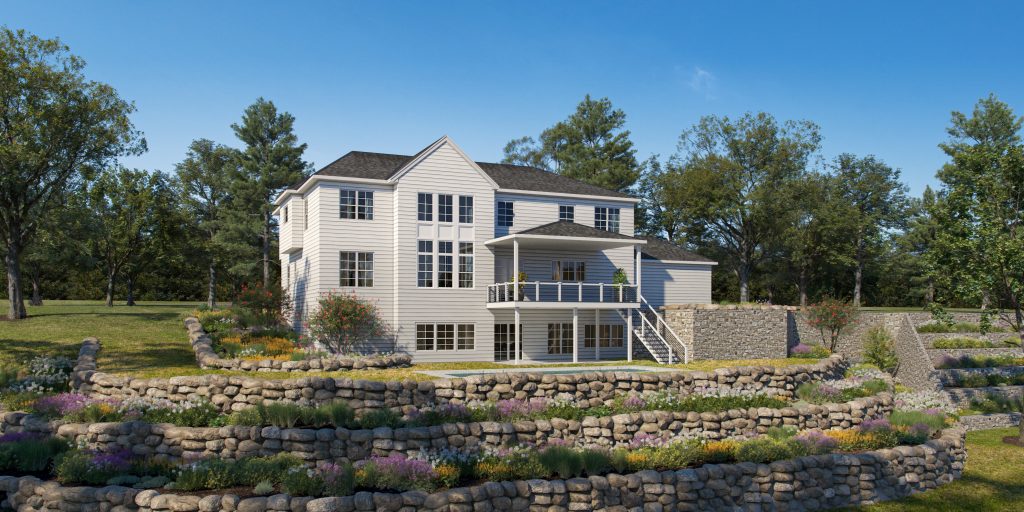
After a month of back-and-forth with the homeowner refining the architectural drawings, we produced a full set of exterior renderings. The results are so realistic that at first glance, it’s easy to mistake them for a photograph of a finished home, complete with manicured landscaping, stone veneer accents, and the surrounding wooded backdrop.
While the renderings are beautiful, they are also functional. Here’s what they’ve already done for this project:
1. Catch Design Details That 2D Plans Can Miss
Architectural drawings are precise, but they’re flat. Without shadows, depth, and scale, it’s easy to miss how a design decision will translate to the real world. On this project, the renderings revealed that the upper section of the front façade was originally cantilevered three feet forward, overhanging the first floor below.
The homeowner hadn’t noticed this from the architectural drawings, and the architect hadn’t flagged it as an issue. But once it was visible in the rendering, the homeowner knew he wanted to bring the first floor forward to align with the upper section. The architect revised the plans, and what could have been a costly change order during framing was resolved before a single board was cut.
This is a core part of what we do at White Maple. Our role during the planning process is to confirm scope and details with homeowners at every stage, so that the home they sign off on is the home they actually want to live in.
2. Make Exterior Selections Tangible
Choosing materials from samples and product sheets is difficult. Seeing how those selections actually interact on a finished home is a completely different experience. For this build, the renderings allowed the homeowner and our team to evaluate:
- The combination of two complementary siding styles — horizontal plank siding and board-and-batten in the gables and upper sections
- A standing-seam metal roof paired with asphalt in select zones
- R-stone veneer on the front elevation
- Shutters, cable railing, and Trex composite decking
Seeing all of these elements together at scale and with context makes it far easier to make confident decisions early, when changes are still inexpensive. Waiting until materials are ordered or installed to realize something doesn’t look right is one of the most avoidable budget overruns in custom construction.
3. Visualize the Full Property Picture
Exterior renderings show the entire environment alongside the house. On this project, the rear rendering captures the terraced retaining wall system, the planned pool, the stone landscaping details, and the way the home sits within the lot. Even the wooded slope behind the property is represented.
This kind of full-picture visualization helps homeowners understand how indoor and outdoor spaces connect, where natural light will fall throughout the day, and whether the landscaping and hardscaping vision aligns with the architecture. It’s the difference between imagining a home and actually seeing it.
What Goes Into a Custom Home Budget: A Real-World Look
Custom home budgets have two distinct components: the construction budget and the budget to prepare your land. Not every lot is build-ready, and the work to make it so can add up quickly. Here’s what goes into each step:
The Construction Budget
This is what most people think of when they consider the cost to build. It covers the structure itself: framing, roofing, windows, doors, insulation, mechanical systems, finishes, and everything that goes into the home from the foundation up.
Custom home construction in Northern New Jersey typically ranges from around $300 to $450 per square foot, and what drives that range is almost entirely the decisions made before the first wall goes up.
A large-scale build focused on functional utility and smart material selections (think Andersen windows and stone countertops) tends to land toward the lower end of that range. A project defined by architectural complexity, like custom millwork, intricate masonry, high-end mechanical systems, bespoke finishes throughout pushes toward the top.
For this Boonton project, the planned specifications include:
- Hardie Plank and board-and-batten siding with Azek exterior trim
- Andersen windows throughout
- Trex decking with aluminum cable rail (U-Rail system)
- R-stone veneer on the front elevation
- Metal roofing as the primary roof system
- Engineered truss system for both floors and the attic
- Custom stacked staircases in the foyer
- Jack-and-Jill bathroom
- Oversized three-car garage
- Expansive primary suite with a sitting area, large walk-in closet, and primary bath
Construction cost per square foot for a custom build like this typically ranges from $300 to $450+, depending on finish level, structural complexity, and material selections. But the per-square-foot figure only tells part of the story.
The Site Work Budget
While this is technically a line item rolled into your full cost, it doesn’t serve anyone well to overlook what it will take to prep the land for building. It covers everything needed to prepare the land for construction: grading and excavation, well and septic, utility connections, driveway, and retaining walls and engineered drainage systems when the terrain demands it.
On a flat, utilities-connected lot with a simple driveway, site work budget may be fairly minimal. On a complex lot like this one with significant slopes, requiring engineered retaining walls, a new well, a new septic system, and substantial fill and grading, site work can easily reach into six figures.
That range matters enormously when you’re evaluating whether a piece of land fits your budget. A lot that looks affordable at the listing price can become a different financial picture once site work costs are understood.
Our Complimentary Lot Assessment
This is why we offer a complimentary lot assessment to prospective clients, whether you’ve already purchased land or are still in the process of evaluating options.
If you bring us a property you’re considering, we’ll walk through the site with you and give you an honest, experience-based read on what the site work might involve: topography and grading challenges, utility availability, septic and well requirements, access and driveway conditions, and any permitting considerations specific to the municipality.
This isn’t a commitment to build. We want you to be informed, so you buy the right land, build the right budget, and move forward with confidence.
Planning That Pays Off
The planning of this project reflects the same core belief: that the time invested in planning before construction begins pays dividends throughout the build and long after it’s complete.
The White Maple Standard is a system we use to ensure projects are thoughtfully designed, carefully planned, and efficient to build. It’s the reason projects like this one stay on scope, on budget, and true to the homeowner’s vision from the first site walk to the final walkthrough.
If you’re thinking about building a custom home in Northern New Jersey, we’d love to talk. Reach out to start the conversation.